Wednesday, July 30, 2008

Book Recommendation: Hungry Planet


I don't usually recommend books on this blog, but I do read a lot of cooking-related books. I am a huge library aficionado, and I usually walk out of there with a huge stack of cookbooks to page through. This book caught my eye, although it's not exactly a cookbook. Hungry Planet does contain some recipes, but mainly it's a photo book that shows families from around the world with a week's worth of food. It's interesting to compare the family from a refugee camp in Chad to a family in North Carolina - their ideas of a week's worth of food are very different!

If you know me in real life, you've probably already heard me talk about this book. I found it so interesting because I have always felt that one of the best ways to get to know someone is to get to know their eating habits. This book is a glimpse into the lives of people all around the world, and the authors make it very interesting. Plus it makes you re-think your own eating habits! It really got me thinking about what would our food supply for a week look like - what would the proportion of prepared to fresh food look like?


If you have later-elementary aged kids, this would be a fantastic book to go through with them. The pictures of the families with their food make it very easy to understand how people from around the world eat differently. Plus, the look on your kid's face when they discover that people in Ecuador eat guinea pigs will be priceless!!

A synopsis, reviews, and an excerpt from Hungry Planet are all available at Amazon.com.

Tuesday, July 29, 2008

Fried Chicken

I grew up hearing stories of my grandmother's legendary fried chicken. I've been trying to convince her to make some, but so far haven't succeeded. So I decided to give it my own shot!


I started with chicken pieces (everything but the thighs, which were saved for another recipe) and seasoned flour. Mike was the one who did the actual frying - he usually lets me do my own thing in the kitchen, but he likes to fry. I guess he enojoys handling oil hot enough to burn your face off!


The cast iron skillet is from his grandmother. We both love using it!
Mike also decided to make hush puppes. I decided to steam some broccoli and green beans to offset the rest of the meal :)
The chicken, in all it's shiny, crispy goodnes.

The chicken was very good, but the hush puppies...oh, the hush puppies! I could have eaten a whole pile of them. But I'm glad I didn't, because what I DID eat has been sitting heavily in my stomach ever since. Was the heartburn worth it? Probably, but I doubt we'll do this again. Now we can say we tried it, but I don't understand how people can stomach eating fried food more than once in a blue moon.

Sunday, July 27, 2008

King Arthur's Choco-Nilla Cake

King Arthur Flour puts out an excellent baking blog from which I've printed out many recipes. Cuban Sandwiches, McMuffins, Focaccia...they're all sitting in my recipe collection, waiting to be tried. The problem with that blog is, they put so much detail into it, they trick you into thinking you know enough about the dish to try it yourself. And if that doesn't get you, the beautiful pictures will kick your craving into high gear. But when I saw this Choco-Nilla Cake, I knew I just had to try it. It looked just complicated enough to be an enjoyable challenge. You have to make up two cakes:


One vanilla...
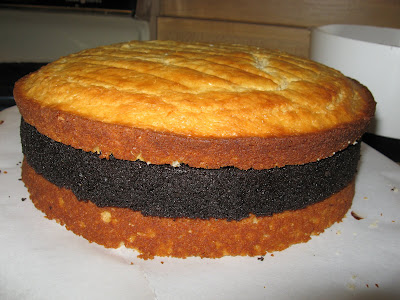
...and one chocolate. The vanilla cake is easy enough to mix up by hand, but I used my mixer for the chocolate layer. No boxed mixes here! The secret to the chocolate layer is the espresso powder that is added to the batter.

Even if you don't like the taste of coffee (which I don't), adding a little coffee (or espresso in this case) heightens the flavor of the chocolate. I've seen this trick before, and it really does work. My favorite chocolate cake recipe calls for hot coffee, and yuuuummm...


After baking up the cakes and gingerly removing them from the pans, I faced the dauting task of cutting both of them in half lengthwise. Toothpicks helped, along with a lot of prayer! I was really nervous about this part, but I took it slow and it turned out okay. I found that taking a deep breath, then holding it as I cut helped.


YES!!


After all the cutting, I was ready to assemble the cake...or was I?!? Actually I had to make up a ganache to put between the 4 layers, but that's just cream and chocolate chips melted together in the microwave, so it didn't take long.

After arranging the first layer on my parchment-covered cake stand (you'll see why I needed the parchment in a minute!), I spread some ganache to within one inch of the edges. This is to keep the weight of the second layer from squishing it all out.

See? Perfect!!


It's perty, aint it?

The last two layers didn't stack up quite as well as the first two, even after I tried to smooth the top of the last vanilla layer out a bit with my knife. All I could do was hope that the icing would cover up the gaps! The recipe recommends inserting skwers to hold the cake together until the ganache hardens, and I highly recommend taking that extra step. In fact, I left mine in until it was ready to serve, since it had to survive the transport to my grandmother's house.

I just spreaded the icing around the skewers, and it worked fine. Remember a few minutes ago when I told you that you'd understand why I needed the parchment under the cake? Now you see why! The ganache icing is MESSY!
After pulling out the parchment strips, it looked a lot better.
The finished product:
This cake is definitely geared more towards adults, especially with the not-overly-sweet ganache icing. To me, the ganache filling was perfect - it complimented the cake wonderfully. However, next time I may try this cake with the same ganache filling and a more traditionalchocolate buttercream icing. It would definitely need to be dark chocolate icing, though, to go with the taste of the cake. Overall, I am very proud of this cake, and I enjoyed the process. It's not a throw-it-together-in-ten-minutes type of cake, but for an occasion where you really want to wow people, it's perfect! My family really enjoyed it, especially my brother (who was visiting from Kentucky, thus the reason for the get-together) and dad, the resident chocoholics! The leftovers were a hot commodity!!

Friday, July 18, 2008

My New Toy

My grandmother gave me her electric wok while she was going through some things, and I was eager to give it a whirl. It cooked my Honey-Chicken Stir-Fry so well! It got hot quickly and fried up nicely. Too bad I burned the rice on the stove....


Yum! Even over instant rice!!

Saturday, July 05, 2008

Lemon Curd Trifle with Fresh Berries

For the Fourth of July I tried Tyler Florence's Lemon Curd Trifle with Fresh Berries. It turned out delicious, but it did take awhile. However, if you can find a lemon pound cake (which I was not able to do), this recipe would not require any baking, which would cut down on your kitchen time.
I found that the bowl to my Kitchen Aid mixer worked perfectly to prepare the curd over a pot of simmering water. Then I could stick it straight in the fridge to chill and whip the Cool Whip in without changing bowls!


The recipe called for sweeted Whipped Cream, but I used Light Cool Whip with delicious results. Using real whipped cream MAY have made the curd easier to build the trifle with, but I was going for slightly less fat :)


As mentioned before, I could not find a lemon pound cake for purchase, so I decided to make one from a regular pound cake mix and replace about 2/3 of the water in the cake with lemon juice. I also made one other change to the cake: you're supposed to drizzle Lemoncello over the cake after cutting it into cubes, but I used Jim Bean bourbon. It produced a different taste, but it was very good in my opinion. Lemoncello just isn't something I keep handy!
As far as actually building the trifle, the first challenge I faced was the fact that I don't own a trifle bowl, which has straight sides to show off all the pretty layers. But I DO have a tall, cylindrical vase, so I decided to be adventerous and try that. This was my first real attempt at building a trifle, and I learned one thing: the curd spread out a LOT once it sits for a few minutes! It didn't make for a very pretty trifle, but we all agreed that it tasted good!


Mike and I had some after lunch today, and it tasted even better than yesterday. When I make this again (and I plan on it!) I'm going to make it the day before. The lemon and the berries went perfectly with the bourbon-drizzled pound cake. A perfect summer dessert!!