Friday, August 08, 2008

White Cupcakes

Blogger has been misbehaving for the last several days, but we appear to be back to normal. I have a lot to catch up on! First, I made another Lemon-Curd Trifle with Fresh Berries to bring to a friend's house for dessert, which only uses egg yolks. Well, the cheapskate in me can't stand to waste anything, so I had to find a use for all those egg whites...enter Taste of Home's Berry-Topped White Cupcakes! Using only egg whites creates a very delicate, smooth tasting, yummy cupcake that goes perfectly with the cream cheese icing.


I got REALLY adventurous and decided to try making some of them in my new mini-bundt cake pan. As you can see, they rose quite a bit, which was great for the regular cupcakes, but I had to trim it off the mini bundts so they would sit flat.


I piped icing right into the middle of the mini bundts, and since I already had the pipe bag out, I did the regular cupcakes, too. The cream cheese icing was the perfect consistency to do this! I have absolutely no experience with piping, whatever I do is the result of me plodding my way through figuring it out.
I think it makes the cupcakes so special looking! It really was worth the extra time, plus it was a lot easier than it looks! You just have to go slow and turn the cupcake in your hand, not the pipe bag.
I decided to top the mini bundts with blueberries at the last minute because I thought they needed a little extra something, but the cupcakes were so pretty as they were I decided to leave them alone. I think I liked the cupcakes a little better than the mini bundts, but that's just because they had more icing and I LOVE me some icing! If you're not a big icing fan, using mini bundts would be a great way to enjoy more of the cake with less icing.

I love this recipe - it's so unlike any other cupcake! Nery said it was the best cupcake she's ever had....I don't know about THAT, but they are very tasty!!

Wednesday, July 30, 2008

Book Recommendation: Hungry Planet


I don't usually recommend books on this blog, but I do read a lot of cooking-related books. I am a huge library aficionado, and I usually walk out of there with a huge stack of cookbooks to page through. This book caught my eye, although it's not exactly a cookbook. Hungry Planet does contain some recipes, but mainly it's a photo book that shows families from around the world with a week's worth of food. It's interesting to compare the family from a refugee camp in Chad to a family in North Carolina - their ideas of a week's worth of food are very different!

If you know me in real life, you've probably already heard me talk about this book. I found it so interesting because I have always felt that one of the best ways to get to know someone is to get to know their eating habits. This book is a glimpse into the lives of people all around the world, and the authors make it very interesting. Plus it makes you re-think your own eating habits! It really got me thinking about what would our food supply for a week look like - what would the proportion of prepared to fresh food look like?


If you have later-elementary aged kids, this would be a fantastic book to go through with them. The pictures of the families with their food make it very easy to understand how people from around the world eat differently. Plus, the look on your kid's face when they discover that people in Ecuador eat guinea pigs will be priceless!!

A synopsis, reviews, and an excerpt from Hungry Planet are all available at Amazon.com.

Tuesday, July 29, 2008

Fried Chicken

I grew up hearing stories of my grandmother's legendary fried chicken. I've been trying to convince her to make some, but so far haven't succeeded. So I decided to give it my own shot!


I started with chicken pieces (everything but the thighs, which were saved for another recipe) and seasoned flour. Mike was the one who did the actual frying - he usually lets me do my own thing in the kitchen, but he likes to fry. I guess he enojoys handling oil hot enough to burn your face off!


The cast iron skillet is from his grandmother. We both love using it!
Mike also decided to make hush puppes. I decided to steam some broccoli and green beans to offset the rest of the meal :)
The chicken, in all it's shiny, crispy goodnes.

The chicken was very good, but the hush puppies...oh, the hush puppies! I could have eaten a whole pile of them. But I'm glad I didn't, because what I DID eat has been sitting heavily in my stomach ever since. Was the heartburn worth it? Probably, but I doubt we'll do this again. Now we can say we tried it, but I don't understand how people can stomach eating fried food more than once in a blue moon.

Sunday, July 27, 2008

King Arthur's Choco-Nilla Cake

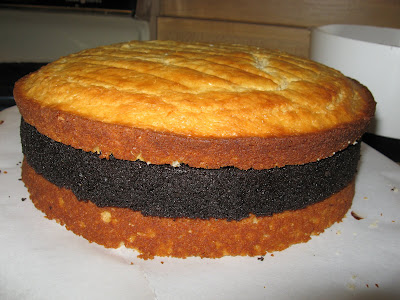
King Arthur Flour puts out an excellent baking blog from which I've printed out many recipes. Cuban Sandwiches, McMuffins, Focaccia...they're all sitting in my recipe collection, waiting to be tried. The problem with that blog is, they put so much detail into it, they trick you into thinking you know enough about the dish to try it yourself. And if that doesn't get you, the beautiful pictures will kick your craving into high gear. But when I saw this Choco-Nilla Cake, I knew I just had to try it. It looked just complicated enough to be an enjoyable challenge. You have to make up two cakes:


One vanilla...
...and one chocolate. The vanilla cake is easy enough to mix up by hand, but I used my mixer for the chocolate layer. No boxed mixes here! The secret to the chocolate layer is the espresso powder that is added to the batter.

Even if you don't like the taste of coffee (which I don't), adding a little coffee (or espresso in this case) heightens the flavor of the chocolate. I've seen this trick before, and it really does work. My favorite chocolate cake recipe calls for hot coffee, and yuuuummm...


After baking up the cakes and gingerly removing them from the pans, I faced the dauting task of cutting both of them in half lengthwise. Toothpicks helped, along with a lot of prayer! I was really nervous about this part, but I took it slow and it turned out okay. I found that taking a deep breath, then holding it as I cut helped.


YES!!


After all the cutting, I was ready to assemble the cake...or was I?!? Actually I had to make up a ganache to put between the 4 layers, but that's just cream and chocolate chips melted together in the microwave, so it didn't take long.

After arranging the first layer on my parchment-covered cake stand (you'll see why I needed the parchment in a minute!), I spread some ganache to within one inch of the edges. This is to keep the weight of the second layer from squishing it all out.

See? Perfect!!


It's perty, aint it?

The last two layers didn't stack up quite as well as the first two, even after I tried to smooth the top of the last vanilla layer out a bit with my knife. All I could do was hope that the icing would cover up the gaps! The recipe recommends inserting skwers to hold the cake together until the ganache hardens, and I highly recommend taking that extra step. In fact, I left mine in until it was ready to serve, since it had to survive the transport to my grandmother's house.

I just spreaded the icing around the skewers, and it worked fine. Remember a few minutes ago when I told you that you'd understand why I needed the parchment under the cake? Now you see why! The ganache icing is MESSY!
After pulling out the parchment strips, it looked a lot better.
The finished product:
This cake is definitely geared more towards adults, especially with the not-overly-sweet ganache icing. To me, the ganache filling was perfect - it complimented the cake wonderfully. However, next time I may try this cake with the same ganache filling and a more traditionalchocolate buttercream icing. It would definitely need to be dark chocolate icing, though, to go with the taste of the cake. Overall, I am very proud of this cake, and I enjoyed the process. It's not a throw-it-together-in-ten-minutes type of cake, but for an occasion where you really want to wow people, it's perfect! My family really enjoyed it, especially my brother (who was visiting from Kentucky, thus the reason for the get-together) and dad, the resident chocoholics! The leftovers were a hot commodity!!

Friday, July 18, 2008

My New Toy

My grandmother gave me her electric wok while she was going through some things, and I was eager to give it a whirl. It cooked my Honey-Chicken Stir-Fry so well! It got hot quickly and fried up nicely. Too bad I burned the rice on the stove....


Yum! Even over instant rice!!

Saturday, July 05, 2008

Lemon Curd Trifle with Fresh Berries

For the Fourth of July I tried Tyler Florence's Lemon Curd Trifle with Fresh Berries. It turned out delicious, but it did take awhile. However, if you can find a lemon pound cake (which I was not able to do), this recipe would not require any baking, which would cut down on your kitchen time.
I found that the bowl to my Kitchen Aid mixer worked perfectly to prepare the curd over a pot of simmering water. Then I could stick it straight in the fridge to chill and whip the Cool Whip in without changing bowls!


The recipe called for sweeted Whipped Cream, but I used Light Cool Whip with delicious results. Using real whipped cream MAY have made the curd easier to build the trifle with, but I was going for slightly less fat :)


As mentioned before, I could not find a lemon pound cake for purchase, so I decided to make one from a regular pound cake mix and replace about 2/3 of the water in the cake with lemon juice. I also made one other change to the cake: you're supposed to drizzle Lemoncello over the cake after cutting it into cubes, but I used Jim Bean bourbon. It produced a different taste, but it was very good in my opinion. Lemoncello just isn't something I keep handy!
As far as actually building the trifle, the first challenge I faced was the fact that I don't own a trifle bowl, which has straight sides to show off all the pretty layers. But I DO have a tall, cylindrical vase, so I decided to be adventerous and try that. This was my first real attempt at building a trifle, and I learned one thing: the curd spread out a LOT once it sits for a few minutes! It didn't make for a very pretty trifle, but we all agreed that it tasted good!


Mike and I had some after lunch today, and it tasted even better than yesterday. When I make this again (and I plan on it!) I'm going to make it the day before. The lemon and the berries went perfectly with the bourbon-drizzled pound cake. A perfect summer dessert!!

Monday, June 30, 2008

Santa Maria Tri-Tip Roast

We've never tried a beef roast on the Egg, so we decided to try this recipe, which features a crust of cayenne and black pepper, garlic, rosemary, and salt. I have a nice picture of the roast ready to go on the Egg, but for some reason Blogger is not cooperating. But you can see what it looked like right before we devoured it:


And yes, it was just as good as it looks! It was pretty pepper-y, so we'll scale that back next time, but it was succulent and juicy and quite a treat! There was enough left over to make one of Mike's favorites, French Dip Sandwiches:


I'm not sure which was better - the roast or the leftovers! We plan on doing this often - it makes a great weekend treat to have a roast, and the leftovers make a great weekday meal.

Saturday, June 28, 2008

Salsa!!


(sorry about the bad picture!)

I love making my own salsa, especially since I now grow a lot of the ingredients myself.


My Patio Princess tomatoes have kept us well-supplied with salsa this year, and with what I planted for next year, I should have enough to make salsa and homemade tomato sauce:

Those are my baby tomato plants in the bottom right-hand corner, and the big plants along the left side are my peppers - another delicious addition! I have green bell, banana, jalepeno and cayenne. The banana and bell peppers are pretty mild, but we tried our first jalepeno in our latest salsa batch. Jalepenos are funny because plants vary in their level of heat. They can be very mild to pretty darn hot (although nothing like what Dee's husband grows!) I'm glad I grow my own now, because I know the heat level of that particular plant.

And lemma tell ya, I don't know if it's because they're home-grown, but mine are hot! We had three fairly small peppers, so I decided to put them all in. We actually had to wait until more tomatoes ripened to add to the salsa batch before we could eat it! When something is too spicy for Mike, you know it's hot!

My good friend Jennifer asked me about making salsa, so I wanted to share how incredibly easy it is to make your own. It's also much better than the canned stuff you get at the grocery store. Salsa is great because you can put lots of different things in it, and as little or as much as you like. You need to start with 4 or 5 good-sized tomatoes. You need to decide beforehand whether you want your salsa to be chunky or smooth. If you want it chunky, just chop all the ingredients as fine as you want. If you want it smooth, you will need to put all the ingredients through a food processor (you could use a blender, too). Just a few pulses will do. Chop up the ingredients in rough, large chunks before doing this. Now you need to think about what else you want to add to your salsa. Here is a list to get you started, add as many or as few as you like.

  • One small-to-medium onion (I think red onions are delicious in salsa!)
  • One bell pepper (any color)
  • One pepper of any other type, including banana, chile, cayenne....just be sure you know what heat level you're dealing with!
  • One jalepeno pepper (to me, salsa with a jalepeno tastes more authentic; see note above)
  • 1/2 Cup corn (either frozen or cut off the cob fresh. If you're processing the ingredients, add this afterwards).
  • 1/2 Cup black beans (again, add after processing)
  • 1/2 a zuchinni (I learned this trick from a sneaky mother whose son hates zukes but loves salsa).
  • 1-2 garlic cloves (a must in my house!)

That's all I can think of for now. If you have any other ingredients you add, I'd love to hear about them! You might find your salsa to be very watery, depending on how juicy your tomatoes were. If it is too juicy for your taste, you can always strain it. Catch the juice and freeze it for the next time you make soup - it will blow your mind!

There is one more step that is completely optional, and that is cooking the salsa. Some people like to do this if they are serving the salsa immediately. Cooking helps the flavors meld together. Taste it and see if you think it's necessary; if you think it's fine the way it is, then just enjoy! If you decide to cook it, do it in a saucepan on the stove over medium-low heat for 10 minutes. If you put the salsa in the refrigerator overnight, this will also meld the flavors.

Try out your salsa-making skills - you won't want to go back once you do!!

Monday, June 23, 2008

Jalepeno Heaven

Mike picked some jalepenos off our plant and I was so taken by the waxy, vibrant color that I just had to take a picture. These went into the freezer until our next batch of tomatoes is ripe for some SALSA!
Blueberry Streusel Coffee Cake


Every blueberry season, I have a collection of fresh blueberry recipes waiting in the wings. I absolutely LOVE blueberries, so I was eager to try this recipe. Dee over at The Daily Stitch first got me interested in the recipe, and since it originally came from Penzey's I figured it had to be good. I made one modification by skipping the walnuts in the struesel topping.


The coffe cake came out very with a very pretty golden top. It was also very fluffy and light - the only thing I would change about the recipe would be to add more blueberries - I like it loaded!


I served the coffee cake at my stitching group get-together last week, and it went over well. Lynn said that her son devoured the pieces I sent home for her, so it has the kid seal of approval, too!

And it almost had the kitty seal of approval!


Thursday, June 19, 2008

Black Bean Croquettes

I've made these once before, but apparently I never posted it. Mike actually made them the first time (which may explain why I forgot to post about them), and here they are:


Obviously we enjoyed them, since I made them again. This time I took a lot more pictures:


I had some black beans leftover from the Beef and Black Bean Burritos, so instead of canned beans I used dried (rehydrated, of course). Once I mashed them I worried that I should have cooked the beans, but it turned out fine. They were a little harder to mash, though. I also just threw in some of my homemade salsa instead of messing with their salsa recipe. The corn is frozen and I also threw in some chives instead of scallions....close enough.


You have to take the black bean mixture and make little mounds out of them, then roll in breadcrumbs. Don't mind my messy hands.

Mike used Italian breadcrumbs when he made them, and I used panko. Both were good, but I think I liked the panko a little better.


Plated up after a quick trip to the oven. I served them with fresh salsa on the side and some tortilla scoops, along with some steamed broccoli.


If you did them like this, they'd make great tapas!!

These croquettes made for a satisfying, guilt-free meal. I plan on making these often to stretch our budget, because it doesn't feel like a "cheap" meal. And get this: even Sophie liked them!!

Monday, June 16, 2008

Beef and Black Bean Burritos

I decided to try a twist on the traditional beef burritos that are pretty common in this house. I'm always looking for ways to stretch our food budget, so the addition of black beans to the beef seemed like a great idea to me!

I had a lovely picture of the beef/bean mixture to show you guys, and for some reason Blogger keeps downloading it sideways. So just imagine a nice mixture of beef and black beans with cumin, coriander, and chili powder. I also added some corn I cut off the cob, and the reason I did this is because of these guy:

I had some salsa ingredients I picked from the garden, and I wanted to add some of the corn that my in-laws brought from St. Augustine. Since I had about half a cob's worth of corn left, I decided to add it into the beef and beef mixture.


Here's the end product, along with some green beans. We both really enjoyed this - it was nice change. Mike ate three of them, I had two, and I still had enough left over to make five more! We'll have enough for two lunches, so for two meals feeding two people, it costed me:*
$4.00 for 1.25 lbs. lean ground beef
$2.00 for 10 flour tortillas
50 cents for the seasonings and onion
Since the tomatoes and peppers for the salsa came from my garden, we'll say about $1.00 for the seeds, plus irrigation, etc.
$2.00 for the toppings - cheese, sour cream, etc.
50 cents for the black beans - I used dried instead of canned
NOTHING for the corn (thanks, in-laws!)
The green beans were brought fresh, and I washed, snapped and froze them myself. I'd say the 2 servings we ate cost about 50 cents.
For a total of $5.25 per meal for two people, or $2.62 per person, per meal! How's THAT for frugal?!?
*all figures are approximate

Wednesday, June 11, 2008

The Bounty for Today


My banana pepper is EXPLODING! I picked eight of them today, and there's lots more on the bush! Three of them were shared with the neighbors, three went into the freezer, and the others went into a salsa along with the tomatoes. This year is my first growing tomatoes, and I remember reading that once your tomatoes start to ripen, it's like a tidal wave. Whoever said that was right...I picked these this morning, and by evening four more were ready to be picked! But we're not complaning - just making ourselves fat on chips and salsa!