King Arthur Flour puts out an excellent baking blog from which I've printed out many recipes. Cuban Sandwiches, McMuffins, Focaccia...they're all sitting in my recipe collection, waiting to be tried. The problem with that blog is, they put so much detail into it, they trick you into thinking you know enough about the dish to try it yourself. And if that doesn't get you, the beautiful pictures will kick your craving into high gear. But when I saw this Choco-Nilla Cake, I knew I just had to try it. It looked just complicated enough to be an enjoyable challenge. You have to make up two cakes:
.JPG) One vanilla...
One vanilla... ...and one chocolate. The vanilla cake is easy enough to mix up by hand, but I used my mixer for the chocolate layer. No boxed mixes here! The secret to the chocolate layer is the espresso powder that is added to the batter.
 Even if you don't like the taste of coffee (which I don't), adding a little coffee (or espresso in this case) heightens the flavor of the chocolate. I've seen this trick before, and it really does work. My favorite chocolate cake recipe calls for hot coffee, and yuuuummm...
.JPG) After baking up the cakes and gingerly removing them from the pans, I faced the dauting task of cutting both of them in half lengthwise. Toothpicks helped, along with a lot of prayer! I was really nervous about this part, but I took it slow and it turned out okay. I found that taking a deep breath, then holding it as I cut helped.
After baking up the cakes and gingerly removing them from the pans, I faced the dauting task of cutting both of them in half lengthwise. Toothpicks helped, along with a lot of prayer! I was really nervous about this part, but I took it slow and it turned out okay. I found that taking a deep breath, then holding it as I cut helped. YES!!
YES!!After all the cutting, I was ready to assemble the cake...or was I?!? Actually I had to make up a ganache to put between the 4 layers, but that's just cream and chocolate chips melted together in the microwave, so it didn't take long.
.JPG) After arranging the first layer on my parchment-covered cake stand (you'll see why I needed the parchment in a minute!), I spread some ganache to within one inch of the edges. This is to keep the weight of the second layer from squishing it all out.
After arranging the first layer on my parchment-covered cake stand (you'll see why I needed the parchment in a minute!), I spread some ganache to within one inch of the edges. This is to keep the weight of the second layer from squishing it all out..JPG) See? Perfect!!
See? Perfect!!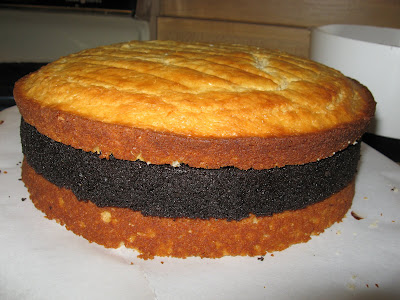 It's perty, aint it?
 The last two layers didn't stack up quite as well as the first two, even after I tried to smooth the top of the last vanilla layer out a bit with my knife. All I could do was hope that the icing would cover up the gaps! The recipe recommends inserting skwers to hold the cake together until the ganache hardens, and I highly recommend taking that extra step. In fact, I left mine in until it was ready to serve, since it had to survive the transport to my grandmother's house.
I just spreaded the icing around the skewers, and it worked fine. Remember a few minutes ago when I told you that you'd understand why I needed the parchment under the cake? Now you see why! The ganache icing is MESSY!

After pulling out the parchment strips, it looked a lot better.
The finished product:

This cake is definitely geared more towards adults, especially with the not-overly-sweet ganache icing. To me, the ganache filling was perfect - it complimented the cake wonderfully. However, next time I may try this cake with the same ganache filling and a more traditionalchocolate buttercream icing. It would definitely need to be dark chocolate icing, though, to go with the taste of the cake. Overall, I am very proud of this cake, and I enjoyed the process. It's not a throw-it-together-in-ten-minutes type of cake, but for an occasion where you really want to wow people, it's perfect! My family really enjoyed it, especially my brother (who was visiting from Kentucky, thus the reason for the get-together) and dad, the resident chocoholics! The leftovers were a hot commodity!!


1 comment:
Jacki - Bravo, BRAVISSIMO! You followed the directions and made a lovely (and delicious, it sounds) cake. Glad your family enjoyed it. I certainly enjoyed watching someone else do it! Cheers- PJ Hamel, King Arthur Flour baker/blogger
Post a Comment